10 Essential Makeup Techniques Every Beauty Lover Should Master

Flawless Foundation Application for a Seamless Base
Mastering the Perfect Winged Eyeliner Look
Contouring and Highlighting for Defined Features
Creating Smoky Eyes That Last All Day
Achieving the Perfect Bold Lip Color
What This Post Covers (and Why You'll Want to Read Every Word)
This guide walks through ten foundational makeup techniques that separate beginners from confident, skilled artists. Whether you're building a daily routine or preparing for special occasions, these methods form the backbone of every great look. Mastering them means spending less time frustrated in front of the mirror and more time enjoying the creative process. The techniques here work across skin types, tones, and personal styles—so there's something valuable for everyone, from the barely-there minimalist to the full-glam enthusiast.
What's the Best Way to Prep Skin Before Applying Makeup?
The best way to prep skin involves cleansing, moisturizing, and applying primer in that exact order. Without proper preparation, even the most expensive foundation will look patchy, cakey, or fade within hours.
Start with a gentle cleanser suited to your skin type—CeraVe Hydrating Facial Cleanser works beautifully for dry skin, while oily complexions benefit from something like La Roche-Posay Purifying Foaming Cleanser. Pat (don't rub) the face dry with a soft towel.
Next comes moisturizer. Even oily skin needs hydration—skipping this step triggers excess oil production that breaks down makeup faster. Allow the moisturizer to absorb fully—about three to five minutes—before moving on. Rushing this guarantees your foundation will slide right off by noon.
Primer is the final prep step, and it's not optional if you want longevity. Mattifying primers (like the Becca Ever-Matte Poreless Priming Perfector) control shine, while hydrating primers (Too Faced Hangover Rx) add dewiness. For large pores, a silicone-based primer such as Smashbox Photo Finish Foundation Primer smooths texture instantly.
How Do You Achieve a Flawless Foundation Application?
A flawless foundation application requires the right tools, proper blending, and building coverage gradually rather than applying one thick layer. The goal is skin that looks like skin—just more even and polished.
Tool choice matters enormously. Beauty sponges (the beautyblender remains the gold standard) deliver seamless, natural finishes by pressing product into the skin rather than pushing it around. Dense synthetic brushes work well for fuller coverage, while fingers (surprisingly effective) warm up the product for better blending—just ensure they're clean.
Apply foundation in thin layers, starting from the center of the face where most people need coverage, and blend outward. The jawline and hairline need attention too—nothing looks worse than a visible makeup mask. Build coverage only where needed (usually around the nose, chin, and under eyes) rather than blanketing the entire face in heavy product.
Setting the foundation with powder prevents transfer and extends wear time. Laura Mercier Translucent Loose Setting Powder has earned its cult status for good reason—it locks makeup in place without looking dry or ashy.
Why Does Concealer Application Technique Matter So Much?
Concealer application technique matters because this product sits on some of the most delicate, expressive areas of the face—the under eyes, around the mouth, and on blemishes. Poor technique creates creasing, emphasizes texture, or draws attention to exactly what you're trying to hide.
For under-eye darkness, choose a concealer one shade lighter than your foundation with a peach or orange undertone to neutralize blue/purple tones. The NARS Radiant Creamy Concealer offers excellent coverage without drying out that thin under-eye skin. Apply in an upside-down triangle shape rather than dotting directly on the dark circles—this brightens the entire area and looks more natural.
Blemish concealing requires the opposite approach: exact placement with a small brush, matching your skin tone exactly (not lighter), and setting immediately with powder to prevent the product from sliding off during the day. Let the concealer sit for thirty seconds before blending—this "cooking" time allows it to thicken and provide better coverage.
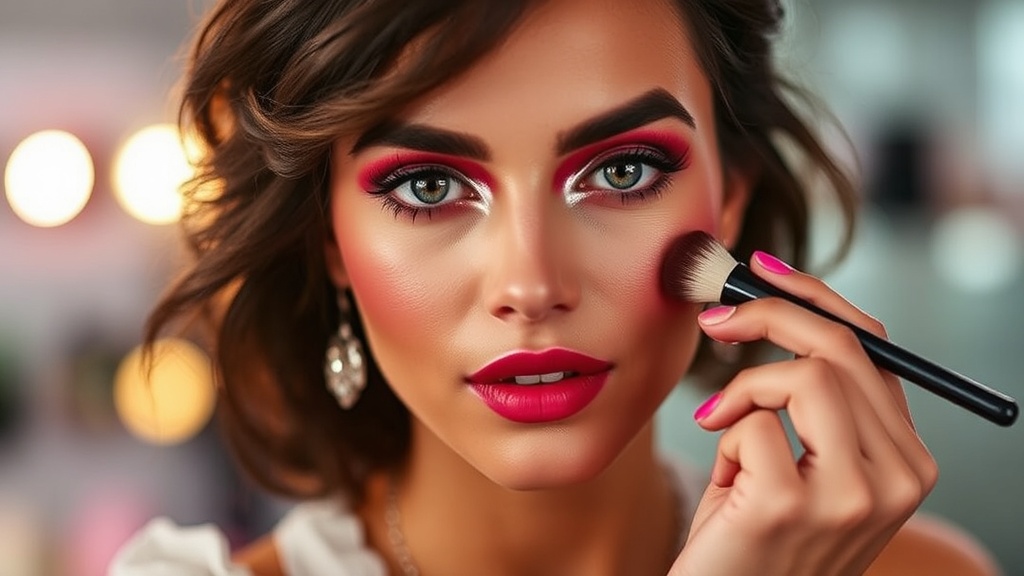
The Art of Contouring and Highlighting
Contouring and highlighting sculpt the face by creating shadows and bringing forward high points. When done subtly, it looks like natural dimension—when overdone, it reads as obvious stripes.
Cream contour products (like the Fenty Beauty Match Stix) blend more naturally into skin and work best for dry or mature complexions. Powder contours (Benefit Hoola remains a classic) suit oily skin types and are more forgiving for beginners. The key placements: under the cheekbones, along the jawline, at the temples, and down the sides of the nose for contour. Highlighter belongs on the tops of cheekbones, the bridge of the nose, the cupid's bow, and the inner corners of eyes.
Blend with a dedicated brush or sponge—no harsh lines should remain visible. The light should hit your face and create natural-looking shadows, not obvious brown streaks.
What's the Secret to Perfect Eyebrow Shaping?
The secret to perfect eyebrow shaping is following your natural bone structure rather than forcing an artificial shape—and filling in sparse areas with hair-like strokes rather than drawing solid blocks of color.
Every great brow starts with mapping. Hold a pencil vertically against the outer edge of your nostril—where it hits the brow is where it should begin. Pivot the pencil to cross the pupil while looking straight ahead—that's where the arch peaks. Angle it to the outer corner of the eye—that's where the brow ends. Plucking or trimming outside these boundaries typically creates an unbalanced look.
For filling, brow pencils (Anastasia Beverly Hills Brow Wiz) offer precision for sparse areas. Pomades (the same brand's Dipbrow Pomade) deliver bold, defined brows that last all day—though they require a lighter hand. Brow gels (Glossier Boy Brow) add texture and hold hairs in place. The finished brows should look like sisters, not identical twins—slight asymmetry is natural and actually more flattering.
How Do Professional Makeup Artists Create Stunning Eye Looks?
Professional makeup artists create stunning eye looks by using transition shades, building color gradually, and understanding how different finishes (matte, shimmer, metallic) interact with light and eye shape.
Every eye look needs three types of shadows: a transition shade (matte, two shades deeper than skin tone), a crease shade (to add depth), and a lid shade (often shimmery or metallic for dimension). The Anastasia Beverly Hills Soft Glam palette contains all three in wearable, blendable formulas.
Apply transition shade through the crease with a fluffy brush using windshield-wiper motions. This diffused edge makes everything else blend better. Add deeper colors to the outer corner and crease, building slowly. Pack shimmers onto the lid with a flat brush or finger—the warmth helps them adhere better.
Eyeliner placement changes eye shape dramatically. Tightlining (lining the upper waterline) defines eyes without obvious liner. Winged liner elongates round eyes. Smudged pencil along the lash line creates soft definition perfect for daytime.
Mascara Application for Maximum Impact
Great mascara application starts at the roots—not the tips—and involves wiggling the wand upward to coat every lash while adding curl and separation.
Curl lashes first. The Shu Uemura Eyelash Curler fits most eye shapes and creates lasting curl. Hold for ten seconds at the base, five in the middle, and three at the tips.
When applying mascara, place the wand at the root and wiggle side-to-side while pulling upward. This deposits product at the base (creating the illusion of thickness) while separating tips. Two to three coats maximum—more leads to clumping and flaking. For lower lashes, hold the wand vertically and use the tip to coat individual hairs without smudging under the eye.
The Perfect Lip: Liner, Color, and Finish
A polished lip requires definition, even color application, and a finish that complements both the look and the occasion.
Lip liner prevents feathering and defines shape. Choose a shade matching your natural lip color for versatility—MAC Cosmetics' Spice and Soar remain industry staples. Outline the natural lip line (or slightly just outside for fullness), then fill in the entire lip with liner before applying lipstick. This creates a base that extends wear time significantly.
Lipstick finishes range from matte (long-wearing but potentially drying—Fenty Beauty Stunna Lip Paint) to satin (comfortable with slight sheen—Charlotte Tilbury Matte Revolution) to glossy (hydrating but high-maintenance—Dior Addict Lip Glow). Liquid lipsticks offer maximum longevity but require precise application and can feel tight on the lips.
Setting Spray: The Step Most People Skip
Setting spray isn't fancy extra credit—it's the step that melts powders into skin, extends wear time by hours, and removes that powdery finish that makes makeup look obvious.
Hold the bottle eight to ten inches from the face and mist in an "X" pattern, then a "T" pattern. This ensures even coverage without saturating any one area. Urban Decay All Nighter remains the benchmark for longevity, keeping makeup intact through heat, humidity, and long days. For dewy finishes, Tatcha Luminous Dewy Skin Mist adds hydration and glow without disturbing makeup underneath.
Technique Comparison: When to Use What
| Technique | Best For | Tool of Choice | Common Mistake |
|---|---|---|---|
| Foundation | Evening skin tone | Damp beauty sponge | Applying too much product |
| Concealer | Brightening and hiding blemishes | Small precision brush | Choosing wrong undertone |
| Contouring | Adding dimension | Angled brush or sponge | Using too warm a shade |
| Brows | Framing the face | Ultra-fine pencil | Over-plucking or over-drawing |
| Eye shadow | Enhancing eye shape | Multiple brush types | Skipping transition shade |
Building Your Skills Over Time
None of these techniques require innate talent—just practice, patience, and willingness to experiment. Start with skin prep and foundation, then gradually add more complex elements like contouring and detailed eye looks. Photograph your work in natural light to spot areas for improvement. Watch tutorials from working makeup artists (Lisa Eldridge and Hung Vanngo offer technique-focused content without excessive product pushing).
The beauty industry constantly launches new products, but these ten techniques remain timeless. Master them, and any product—drugstore or luxury—will perform better in your hands.